What's new

Zenny's Sterling (GP39)

Zenny

Member
I decided it's finally time to make my own Builders Journal here, especially since I've made some progress. I'm not sure how much I'll post about what I've done so far, but I plan on making posts at every major point in the future.

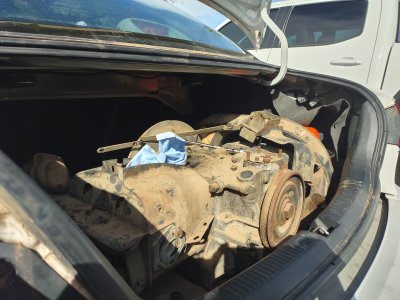
For starters, here's the beginning.
IMG_20211020_201453.jpg

20211022_180604_HDR.jpg

It's a subpar picture, but that's what it looked like. You can see that it has taken a bit of damage and is missing a lot, but at least I have this much.

I'll get pictures later since it seems I haven't taken any, but I do actually have a rear window as well. The plastic shroud that surrounds it and walls off the inside of the body is utterly trashed but the glass is intact.
I have the (assumed) original gauge cluster, wiper motor, hood, lights, and rear bumper as well, so that's a plus. I fully intend on keeping this, with my only current plans being to replace the mounting surface and retouch the exterior with paint.
IMG_20211031_140424.jpg


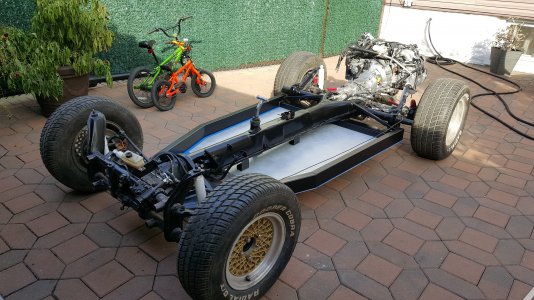
The first thing I recall getting around to removing was the door, which came off on the 23rd of November, 2 days after I got it to my friend's yard. From there we got around to cleaning up the interior, but that was just another detour from the correct path of removing the body. I think it's probably self explanatory what the before and after is.

IMG_20211026_183222.jpg

1645325336041.png

^ Here you can see the horrendous floorpan drop attempt from the previous owner, the pieces of metal were lazily shoved on top of eachother and poorly bent, and the only method of attachment was 6 screws along the rear perimeter and metric tonnes of caulking.

I was still taking classes at this point in time so I didn't have much time to work on the Sterling. This plus my lacking discipline and motivation levels made this disassembly take quite a while, but with the help of 2 friends and a month's time, the body did get removed.

1645326675021.png

20211126_214509_HDR.jpg

(11/26/2021)

I think I've typed enough for now, and this just about catches up to where the car is currently. As of now, it is nearly completely bare (All that's left is to remove the 2 ebrake lines and cut off 2 welded brake line mounts). Once it is bare, the plan is to finish assaulting the frame with wire wheels, cut the underside of the center tunnel, clean and de-rust it, close and weld the bottom back on, and then spraypaint it to protect it from future rust.


Key things about this car:
I've read over the builders manual a few times and after comparing directions to the actual product here, it seems like the original builder cut a lot of corners and didn't do some things at all.
After looking in the front wheel wells, it seems that there is fiberglass repair at the top of the arch, and it is clearly visible on the exterior (see second picture in post). I am under the impression that this car was involved in some kind of front end impact and it has been half repaired.
I really hope the tires on this car are not the original ones, but the time periods do overlap enough to be believable. 3/4 wheels are those solid steel beauties visible in the first and second pictures, and the passenger front wheel is some random swap from some other car. The tires on the 3 steelies are Rodger Ward Indy Champ "Mustard Cutters" according to the incredibly limited info I can find on them. They were probably manufactured in 1972 (below is a magazine picture I was able to find), which is only 4 years before this particular body was made. Judging by the ~2mm of tread left, these guys were pretty heavily used. Does that mean they were on this sterling when it was still driven around? Maybe, but it could be a bit of supporting evidence for my theory of this car being in a crash at some point, and then being sold around as a parts car through the years.
1645326203144.png
 

Zenny

Member
Well there's a couple of formatting errors and I said November instead of October... This is why I was taught to proofread... All in all I'm really enjoying this so far and I really want to thank you guys for your help so far, especially Peter, Letterman, and farfegnubbin.

I have a few questions regarding parts choices in the near future.

I have an acquaintance/mentor with a few 1600's that he may be parting ways with and he has shown interest in this project, especially with helping on the motor. After we have talked, it seems like the general idea is to bore it to 1776, upgrade to dual port heads, mild street cam, and performance carbs with a target c/r no more than 8:1 ideally. He thinks that make at least 100hp to the wheels, and what I've seen online seems to back it up. I was planning to go with the jbugs front disc brake kit and rebuilding the rear drums, but I recall seeing a post recently where somebody recommended 4 wheel disc brakes, and CB Performance was name-dropped. Would you all recommend that I spend the extra money and do 4 wheel discs?

Secondly, I wonder what your suspension recommendations are. As of now I'm planning on sticking with the VW suspension and getting better shocks. There are a lot of steep curbs and speed bumps here though, so I had the idea of putting the car on bags to allow a front end lift. Has anyone here done that, is it necessary, or is it not worth the extra money and weight? I live in the foothills of a mountain, as is a decent part of the city, so many places have not so shallow entrances that I'm afraid would scrape the car.

Once again, thank you all.
 

letterman7

Honorary Admin
:) Build journals are always a fun thing to do. At the very least you'll have a reference point to look back on if you need to work on something in the future! Front end impacts aren't uncommon - you would see evidence of more repair somewhere under the "frunk" where the battery would sit (originally, the spare tire as this was part of the "crash safety system" - not kidding!). If there isn't other repairs in that area, the chances are the fender wells simply cracked from the dreaded front end droop - pretty common in these cars. That can be remedied with some reinforcement from the pan in to the nose with some light steel angle or tube. As for the suspension itself.. for some reason I never found the stock VW suspension to work at all in these cars. It was either too soft or not adjustable enough (save for the rear trailing arms which are another issue). I always wound up putting the cheap-o VW coil-overs on which gave me the clearance for the tires I needed and provided a little more sporty cornering at the expense of a stiffer ride. Air bags have been done - only you can decide if you need that. In most cases, these cars have to approach speed bumps and sharp transitions at a 45° angle to avoid scraping the nose. I always put a piece of thin (1/8") aluminum under the nose to absorb those scrapes. For an engine, a 1776 would suit fine. An 1835 or 1944 would be even better :) You don't need much power to have a lot fo fun despite those saying these cars need a v8!
 

farfegnubbin

Site Owner
Staff member
You may or may not feel like you’re making progress but I actually see a lot of good progress there! You’re admirably doing a frame-off restoration, and I’m seeing a body that’s off the frame and a frame that’s being cleaned up and fixed. Cool. 👍

Regarding whether or not to try an airbag front suspension, I’ll throw a vote towards doing it. It’s a totally reasonable idea with little downside. I’ve actually wanted to try it myself but just never got around to it.

One of the two big drivability issues with the Sterling is that the nose is so low that it scrapes on many transitions and speed bumps. (The other big issue is poor rear 3/4s visibility which is terrifying in traffic.) I live in rural Pennsylvania where everything is either a pothole, a hill, or a dead skunk. With a Sterling, you kinda have to learn where you can and can’t drive, which is sometimes embarrassing. I can tell you where this happens the most: I be someplace unknown and I need to get gas. People are staring at the car because…it’s a Sterling. People stare at Sterlings. And as I’m trying to turn from the street into a gas station, “sssscccrrkkkkkkkkk,” the nose scrapes over the transition, and someone in the crowd rolls their eyes.

I’ve often wished I could temporarily jack up the front suspension about two inches to avoid those moments.

You probably already know how the Bug front suspension works but I’m gonna recap for anyone who might not. On the front suspension of a Bug the vertical cylinder that looks like a shock absorber is just that; it’s JUST a dampener. It has no spring in it. The actual spring that sets the front suspension at a certain height consists of a stack of long spring-steel strips that are hidden within those two horizontal tubes that run from the left shock tower to the other (called the front beam.) The reason that I mention that is because, even if you swap out the shocks for airbags, those metal leaves are still in there and are still the primary spring, especially when there isn’t much air pressure in the bags.

I read once that you’re supposed to take out the leaves or take out the set screw that orients them if you’re using airbag suspension on a Bug. I don’t totally agree with that. To me it makes sense to keep the leaves in there and have them be the primary springs for the suspension and then only inflate the air bags when you need to go over a speed bump. In doing so you could never go LOWER than the leaves are set, but you could always boost higher. Because your car was already assembled, you probably already have an adjustable front beam and could dial in the leaves/the default height of the front suspension as needed.

I like the idea. I’d say explore it. 👍

With regard to engines, I’m always intrigued by alternative engines but I’m definitely in agreement that you don’t need something other than a Bug engine to have fun with these cars. My silver Cimbria has a mildly hopped up Bug engjne and it’s probably my best-sounding car. My rotary turbo has about 110 *additional* horsepower but so what. It’s not like I race my cars so it kinda doesn’t matter. (And the rotary sounds like a leaf-blower.) The Cimbria sounds great and looks great and gets along just fine.

I like the theoretical bump in reliability that you get from modern FI engines (and relative ease of adding stuff like A/C) but it’s true that a Bug engine is more than adequate and fits like a glove.

As for guidance on specific Bug engine upgrades, I’m not the guru and I’ll leave that to others.

Keep us updated on those airbags. 👍
 

Zenny

Member
So, I've been getting parts together for an order, but I really need some advice here. I'm ordering a front and rear disk brake kit and I'd rather have stock height spindles, but the only drilled brakes in 5x130 I can find on CB performance or Jbugs come with 2.5in drop spindles. I'm not sure if the car would ride at the correct height with drop spindles, so I would need adjustable beams to counteract that, I assume. I have no reason to believe that my beams are adjustable, and 20 minutes of useless google searches have basically confirmed that for me. I have found Aircooled.net's beam for sale, which is $400, but that would leave me using my king pin trailing arms. From what I understand, I can't adjust camber with king pins, so I would need to buy ball joint trailing arms as well.

Am I reading too far into this? Would it ride fine with just the 2.5in drop, no compensation? Should I even bother getting the drilled/slotted brakes?

I had my friend try backing out these studs in the middle with an allen key and there was no indication of anything happening, so I told him to put them back where they were. (I am not able to get to the car until the weekend, so I could only have him try a limited number of things)
667893050.jpg
 

letterman7

Honorary Admin
Your beam is stock. Those allen bolts and nuts hold the torsion leaves in place. You can swap for a ball joint beam - they do come spindle to spindle available and I might suggest to do that. They offer a little more adjustment and a slightly better ride quality. It's a bolt-on proposition. And yes, you're reading too far into it :) Disc brakes were standard on the Ghia, so you can start there for the conversion kits. Slotted and drilled look great, but you really don't need them. Are you doing all 4 corners? https://socalautoparts.com/product/...m-fits-stock-drum-spindles-on-49-65-bug-ghia/ or https://socalautoparts.com/product/...2-fits-stock-drum-spindles-on-49-65-bug-ghia/ if you want to switch up the bolt pattern (just picked those - you'll need to find the ones that fit your year pan). You can also look through here: https://www2.cip1.com/beetle-braking/
Be aware that if you add rear discs you must also change your master cylinder to compensate. Not hard, just a pain in the butt. And you need to make sure all the brackets come with the kit for the axles. For cross-drilled.. a quick look tells me that most come with the dropped spindles (rears not withstanding, of course). That doesn't mean you need to use the spindle - you can always sell the drop spindle and get some of your money back. I wouldn't use a drop spindle or lower the front of the car any more than it already is - it's tough enough to crawl over speed bumps as is!
 

Nic

Active member
ZENNY! Good to see some posts from you buddy! Glad you managed to score a car that didn't require a plane ticket and a 12 hour drive.
I bought disc brakes, all 4 corners from CIP. One issue I had is the caliper housing was fouling the back of my front wheels (not tires) but 1/2" spacers took care of that problem. I have a dual port master cylinder and went with the junk yard Volvo reservoir, snaps right in but I also have a pipe clamp to keep it from snapping right out!
 

Zenny

Member
Your beam is stock. Those allen bolts and nuts hold the torsion leaves in place. You can swap for a ball joint beam - they do come spindle to spindle available and I might suggest to do that. They offer a little more adjustment and a slightly better ride quality. It's a bolt-on proposition. And yes, you're reading too far into it :) Disc brakes were standard on the Ghia, so you can start there for the conversion kits. Slotted and drilled look great, but you really don't need them. Are you doing all 4 corners? https://socalautoparts.com/product/...m-fits-stock-drum-spindles-on-49-65-bug-ghia/ or https://socalautoparts.com/product/...2-fits-stock-drum-spindles-on-49-65-bug-ghia/ if you want to switch up the bolt pattern (just picked those - you'll need to find the ones that fit your year pan). You can also look through here: https://www2.cip1.com/beetle-braking/
Be aware that if you add rear discs you must also change your master cylinder to compensate. Not hard, just a pain in the butt. And you need to make sure all the brackets come with the kit for the axles. For cross-drilled.. a quick look tells me that most come with the dropped spindles (rears not withstanding, of course). That doesn't mean you need to use the spindle - you can always sell the drop spindle and get some of your money back. I wouldn't use a drop spindle or lower the front of the car any more than it already is - it's tough enough to crawl over speed bumps as is!
Okay, thank you for this. I have an Adjustable ball joint beam arriving shortly, and I am ordering the brakes + new master cylinder now. One thing I recall seeing is a steering dampener. Would any of you recommend I buy one and make a bracket to attach it to the front beam? Also, should I buy a new steering box? I haven't looked at it too much, but it spun completely fine when I had the car together. Final question: Is there any way I can determine the length of wheel studs I should buy?
 

letterman7

Honorary Admin
Your beam should have a bracket already installed/welded for the damper. Yes, you should have one - makes the ride a little nicer. For the box.. as long as it isn't sticking or has too much play, don't mess with it. Play can be mitigated with the adjustment screws. You definitely need a rag coupler to the box though - get a true OEM style coupler, not a urethane one. For the studs.. that's going to depend on your wheel choice. The shoulder of the nut must be flush with the wheel when it's fully torqued.
 

Zenny

Member
20220313_154048_HDR_1.jpg

I finally got an engine today. I have no idea what the displacement is yet, but it is definitely from the 60's, pre dual port. I got it from a mentor whose relative has had it for over 40 years. Tomorrow is a good day for some teardown and cleaning, so hopefully that all goes well.
 

Attachments

  • 20220313_154057_HDR.jpg
    20220313_154057_HDR.jpg
    4.7 MB · Views: 111

Nic

Active member
Just above the crank pulley, there is a code stamped. Look that up, it will tell you about the engine.
 

Zenny

Member
So, it seems that I made a bit of a mistake. I ordered the new Ball Joint beam intending to replace my Link pin beam, and after painting the chassis I went to install it. I forgot that the Ball Joint upper and lower beams are an extra inch apart. I'm really not sure what I should do now... I think there's only 3 real options. Return/Sell it, Buy a Ball joint chassis head and weld that frame head onto mine, or make some form of adapter that allows me to use the new beam. What do you think I should do?
 

ratrog64

Well-known member
My advise would be to either rebuild the original link pin beam or to go with a later model chassis. I would not suggest making an adapter or welding in a new frame head. Now if you are an experienced welder, and have experience modifying chassis's I'd say go for it. Just be sure to keep everything square and level. Rebuilding the link pin would be the smarter, fastest and cheapest route.
 

Brett Proctor

Well-known member
I would agree with Roger
See about returning the Ball Joint front end and rebuild the front end that you have now(if needed). Parts are readily available.
Finding a chassis(in good shape) with a title these days may be a little hard. At one time the junk yards here had VW chassis's lined up on a block wall but those yards are long gone.
 

Zenny

Member
It took from 11/26/21 to sometime in march to finish the teardown, but it was finished as late as march 20th. I don't have many pictures so I'm not sure exactly when. There were a lot of random things we tried, ranging from wire wheeling and diy sandblasting, along with a lot of wasted time, but we did finally finish. I'm not sure I'll end up posting details on it because it was really just a lot of nothing, but it all resulted in the finishing of the teardown phase. As of March 26th, I finished painting the exterior of the frame.
20220326_184603_HDR.jpg


I've looked inside of the tunnel and it's decently rusty in there, there's been standing water in it before. I have completely ruled out the idea of cutting off the bottom of the tunnel, it's just too risky. Should I even bother cleaning out the tunnel, and how?

670711017 (1).jpg

Some of this is dirt, but the rest of it is powdered rust and there is surface rust for about 2 feet inwards, as well as inside the transmission horns.

Just a few more questions before I move on to the next stage in this project: Building up.

1. For those of you who have dropped floor pans, Is this a decent plan or should I make adjustments to what areas should be cut. These are just a stock image of pans, I only have what's left from the previous cuts.

Fully remove everything inside red box, make a ramp from the front to the green line, and then a flat floor with X" steel. (Should I use 1/4" Steel? 1/8"?)
1649030138551.png


2. Do I want the dropped pans to go all the way to the back, or should they ramp back up?
3. How far should I drop the pans? I'm 5'10" and I don't think I'll be doing much more growing in the vertical department, but the 2 guys helping me are each 6'2" and I'd like for them to be able to fit.
4. farfegnubbin's old project has a lot of reinforcements on it https://www.sterlingkitcars.com/index.php?attachments/modified-sterling-kit-car-chassis-png.9466/, including side impact bars and some rear quarter panel reinforcements by the looks of it. I think that I should add those to mine, and I just want to get some 3rd party input.
 

vpogv

Active member
I am 5'7 and dropped my pans 4" and I wouldn't drop it any more. With the seats bolted down to the pan it'd fit 6'+ people. Here is my drops where they went to give you an idea:

DSC02175.JPG
 

sector

Member
On my original chassis I found it was cheaper and more practical to cut off VW floor pans entirely and build a perimeter frame out of 2"x4", 14 gauge tubing (cost $84). I then bolted 3/16 thick aluminum sheet ($120) to make a floor. This creates full length 4" drop and opens up seat options due to increased width. In addition such approach greatly improves chassis stiffness.
 

Attachments

  • Cimbria 100-078_copy_3984x2241.jpg
    Cimbria 100-078_copy_3984x2241.jpg
    2.6 MB · Views: 137

Zenny

Member
On my original chassis I found it was cheaper and more practical to cut off VW floor pans entirely and build a perimeter frame out of 2"x4", 14 gauge tubing (cost $84). I then bolted 3/16 thick aluminum sheet ($120) to make a floor. This creates full length 4" drop and opens up seat options due to increased width. In addition such approach greatly improves chassis stiffness.
Wow, I actually really like that idea. Sadly aluminum is massively expensive... Looks like $450 from what I've seen so far for just the bottom sheet alone.
 

farfegnubbin

Site Owner
Staff member
I really like what Sector did with his perimeter frame. I’d say it’s not a bad solution to study that and do something similar. And there would be nothing wrong with steel floor boards. Yes, they aren’t as corrosion resistant as aluminum but they are strong and less expensive.

(And you don’t need 1/4 steel unless you plan to use the car for mine-hunting. Even 1/8 inch is ambitious.)
 

sector

Member
Yes 1/4" aluminum would be an overkill. I came across 3/16" sheet and that is what I used. There are plenty aluminum sheets on Craigslist and that is where I found sheet for my floor. But as others stated, you can use steel or even purchase pickup bed cap which is made of fiberglass and cut it to size. Plenty of those on Craigslist as well for cheap and I also came across few in a free classified section as well. There are also composit sheets at home depot that would work. Bottom line any flat sheet of your choice would work.
 
Top